Showing posts with label scenario. Show all posts

Wednesday, 21 December 2011

Narrative Game

Apologies for the time since the last post, I've got distracted with various projects, some of which I'll probably get round to showing on here. I've built up a ~6000pt Vampire army made up of ebay purchases and lots of Mantic's fabulous undead range. I've also been sculpting some of my own figures for a zombie survivor game (more to come soon on this).

I did get together with a couple of my good gaming friends last month though and finally managed to persuade them to have a game of Warmaster Ancients with me. I pretty much used all the figures I have, didn't worry about points values. It was Imperial Rome against Carthage, and I'd guess it was about 3000pts vs 2000pts respectively.

I came up with a quick narrative scenario that the Romans were on a patrol from a main camp and starting cutting up rough in a local village (OK it was a Dark Ages village, but we won't worry about that). The Carthaginians with a sizeable quota of Gallic allies appear on the scene and ambush the patrol, and the main Roman army then turns up to save the day.

6x4 board with the village about 8" square set up ~24" from the Roman board edge and 30" in from the left hand board edge (so roughly central just in the Carthage half of the board). The village is surrounded by a stone wall and so all units behind this count as defended.

The Romans deploy first with 1 unit of legion, 1 unit of archers and 2 units of auxilliaries and 1 leader. The rest of their army deploy as normal near their own board edge.

The Carthage forces deploy as normal.

The objective of the game is to control the village by having 1 or more core units inside it and no enemy units.


It is quite a challenging scenario tactically, because the both main armies need to decide whether to try capitalise on successful commands to try and get forces into the village (either to support or attack), or to try and advance as normal with a solid battle-line. The Carthaginians also have a difficult decision of how early to commit their best units 

In this battle I took command of the Carthaginian forces and Jon and Jan took command of the (evil) Romans.

As the initial ambushers Carthage moved first, but only the Numidians on the left flank moved at all! The Gallic centre and the Spanish light cavalry on the right wing stayed put. Not the start they needed to try and sieze the village before the bulk of the Romans could arrive.

In response Rome got one big legion brigade moving and in the village the commander sent the archers out to get a range on the gauls and moved the auxiliaries up to the wall.

Roman Archers looking a little exposed.

The middle period of the battle saw a lot of manoeuvring but no deceive combats. The archers frustrated the gauls by inflicted confusion on them and the Carthage skirmish screen began to lose odd stands to the main Roman force's artillery and archers.

The Gauls, strangely reluctant to move off their hill and get stuck in.


With the main Roman army now forming a solid battle line to either flank of the village and with their cavalry wing threatening to sweep through the Carthage left flank it was looking decidedly dodgy for them, even though at this stage it was still 0vps each.


As were playing to a time limit the final turn was predictably silly! I charged with most things that could into the village, but despite taking some stands off the Romans all the fights were lost and the Gauls pulled back, the Romans deciding to hold their ground. The Spanish light cavalry on the right managed to sweep right around the Roman's flank and attack their skirmishers in a rare moment of success.

In their last turn, as we knew it was time to call it a day Jon and Jan declared charges with anything that could! The Romans in the village leapt over the wall and charged the demoralised Gauls, while their cavalry on the Carthage left smashed into the Numidians. Both main wings of their battle line also piled in. The results were predictably devastating. Most of the Gauls were wiped out and there were break-through charges aplenty. The only real bright spot for Carthage was the Spanish cavalry chewing through the skirmishers on the hill at the back.


As an impenetrable mist descended onto the battle field the picture was far from clear cut. A count back showed a narrow Roman victory on VP by 85. However no-one was left in control of the village due to the hot headed leader of the patrol!

This was a fun game to play and it was a shame we had to call time on it when we did. I've played a lot of tournament/campaign games where the player going last almost always wins due to being able to call charges where they can wipe out a unit, but leave themselves horribly exposed, knowing there can be no counter-charge as they know it is the last turn.

In this game it was fun to do and I'm glad we got stuck in and rolled some serious dice, but it always feels a tiny bit unsatisfying when a game is nicely balanced and you don't get to see how it would have played out normally. I'm keen to try out a similar scenario in the future though, its good to play something a bit different as most of the games of WMA I play are 1250pt tournament style ones.

Saturday, 22 January 2011

Alternative 1066 Scenario

As you'll know if you've been reading my recent posts, I've got a Viking army on the go at the moment, and a friend of mine is steadily painting up a Norman starter force from Pendraken (~1000pts).

I'm quite keen to get a battle together at some point between our two respective "Dark Ages" forces, and so I decided to write a simple scenario for an alternative 1066 battle. The premise is Harold was never pulled North to fight Harald Hardrada's invading Vikings and instead fought William's Normans first. As in the real Battle of Hastings, he lost and the Norman conquest was underway.

However in this alternative reality Hardrada did still land in Yorkshire and, as in reality, was able to secure York. His army then began to push South and William marched his forces up to meet this new threat. They eventually clash somewhere in the Midlands (where we would likely be playing the game in real life!).

Contenders for this hypothetical battle site are (from the Doomsday book): Quenintune - Quinton, Escelie - Selly Oak or Nortune - King's Norton. We'll decide based on whose house we fight at.

The battle will likely be 1750pts, with a few simple special rules to represent the historical combatants, these are noted next to the entry, otherwise units are as per WMA rulebook:

Normans:

Duke William - 120 (*1)
Eustace II, Count of Boulogne - 80 (*2)
Robert de Beaumont - 80 (*3)
Odo, Bishop of Bayeux - 50 (*4)

6 Knights - 660
4 Retainers - 240
8 Spearmen - 360
4 Archers - 160 (*5)


1750pts

*1 - General with William upgrade from book - portents with +1 cmd bonus
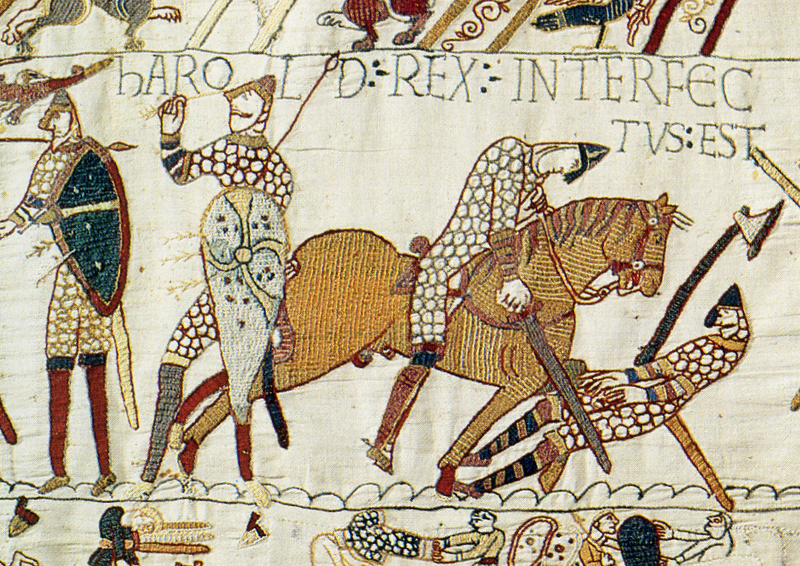
*2 - Is pictured on the Bayeux tapestry urging William to retreat during a particular phase of the Battle of Hastings (see left) - Leader, If he rolls a blunder on a 5 or less count as "our foe is upon us" (no points adjustment)
*3 - Historical Leader, no special rules
*4 - Commissioned the famous tapestry, which surely has nothing to do with the heroic role assigned to him throughout it! Generously counted as "Hero" from the Homeric Greek list, I.E. subordinate with +3 attacks, rather than standard +1 (+10pts) 
*5 - Roughly corresponds to the 3:2:1 ratio in historical sources for  the mix of Horse, Foot and Archers at Hastings

Vikings

Harald Hardrada - 110 (*1)
Tostig Godwinson, Earl of Northumberland - 80 (*2)
Eystein Orri - 80 (*3)
Paul Thorfinnsson, Earl of Orkney - 40 (*4)

Varangians - 85 (*5)
Hirdmen - 75
Berserkers - 50
4 Archers - 160
4 Skirmishers - 120
13 Bondi - 650
8 Flemish Mercenaries - 280 (*6)

1730pts

*1 - King of Norway, name means "Hard Ruler" was renowned for brutally putting down rebellions and for prosecuting several semi-successful, or unsuccessful wars, correspondingly given the "Dictator" rule from WMAA - can re-roll failed orders, command drops by -1 for every unsuccessful re-roll.
*2 - King Harold's brother, defected to Norway and persuaded Hardrada to invade. Not reckoned much good as a battlefield leader, either before defection in Northumberland, or as part of the Norwegian force. Leader, if he rolls a blunder command value drops by -1
*3 - At the Battle of Stamford Bridge he was left with the rear-guard by the invasion fleet. Force marched his armoured troops to join the battle so hard some reportedly dropped dead of exhaustion on reaching the battlefield. Leader - Ignores the first -1 for issuing a consecutive order to the same unit/brigade once per turn (i.e. 1st order - +/-0, 2nd consecutive order +/-0, 3rd consecutive order -2).
*4 - Subordinate, also remained with the ship rearguard at the Battle of Stamford Bridge
*5 - Before successfully claiming the crown of Norway, Harald spent many years in exile including fighting with the fabled elite infantry of the Rus, The Varangian Guard, where he rose to a command position. I have generously given one unit of Hirdmen the Bodyguard rule for +1 hits per stand (+10pts) to count as a unit of Varangian Guard. Although not a rule as such, it would be appropriate for the Varangian Guard to remain as a reserve, and should they get into combat for Harald to join them to either lead them to victory or die a heroic (or futile!) death in the manner of legendary Vikings!
6* - Tostig had numerous "Flemish Mercenaries" in his pay, which was his contribution to the invasion force. I haven't been able to find a great out about them, other than they were obviously professional mercenaries, and were renowned for being a source of dissension in armies. At Battle of Stamford Bridge they fought with shields. Additional entry to the Norse list: I have been assigned as medium infantry (3 attacks, 3 hits, 6+ save), with the unreliable rule. In addition should they be brigaded with other troops there is an additional -1 command penalty, to represent them sowing discord and distrust.

Summary:

The Vikings have the superior numbers, but the Normans are likely to be able to run rings around them given their better commander:brigade ratio. The knights obviously remain the greatest danger. As the battle goes on the Viking's ability to manoeuvre is likely to get worse due to special rules *1 and *2, but as at Stamford Bridge Orri's ability to move men quickly could be key to rescuing a sticky situation. Again as in history, Tostig and his Flemish Mercenaries make up a substantial and unpredictable part of the Norwegian force.

Frankly, the Norman combined arms should carry the day and Tostig and Hardrada will likely end much as they did in history, with just the foe and the location different.

I did a breif search for other alternative scenarios of 1066, but I couldn't find any; let me know if you have played or seen something similar (with a link if you can).